
 Lets start at the beginning shall we? This box is made from two pieces of paper; a piece of kraft cardstock and a piece of vellum. I am using PTI vellum which is much thicker than any other vellum I have worked with. I don't think it would work so well with a flimsy vellum. It would work fine with clear acetate.
  Making the box is pretty simple. Simply take the size of your card (mine was 4.25 x 5.5) and add a quarter of an inch. So that would be 4.5 x 5.75. Then add an inch to all sides. So now we are at 6.5 x 7.75, with me so far? Cut your cardstock to be 6.5 x 7.75. Score at 1 inch on all sides. Cut into two of the short lines on the two long sides so that you can fold up your little box. Clip the corners at a diagonal so they don't peak out. Now before you glue it together stamp your little sides. Keep in mind that the fold is the bottom, that way when you put it together it will all be right side up. (yes, I have ruined many a box with upside down stamping). Ok now for the vellum piece. This is a little trickier. First of all it needs to be just a hair smaller because the lid tucks in the box not over it. So remove about an 1/8th of inch from the original measurements form the bottom. Fraction time! LOL I just cut mine to the original (6.5x7.75) then I scooch it over and take off an eighth of an inch from the width and the length. Now go score that puppy at one inch on all sides. Cut into it the same way and give a test fit. Does it fit perfectly? If so slap on some score tape. If it poofs upwards to much go back and trim a little off the sides, then slap on the score tape. Ok box is done!
 Moving on to cards and envies. If ever there was a time for a decorated envie, its now! Lets do that first cause its easier. Select your envie. Stamp a coordinating stamp on the flap. Then turn it over and use an adorable fillable frame for the addressee portion and a cute little matching stamp in the corner. Repeat for all envies.
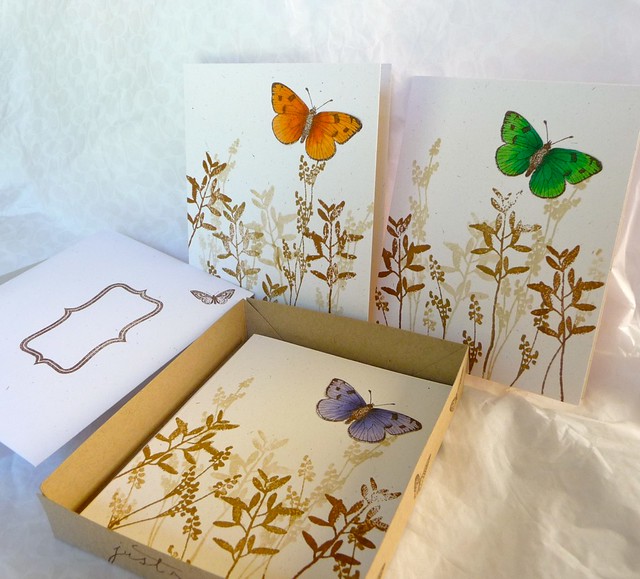
Last but not least, we have the cards. Cut your paper and score it. I am using rustic white by PTI. Stamp the background with a variety of brown inks. I am using Life stamp set by PTI and distress inks in vintage photo and brushed corduroy. I am also using PTI chai ink. When the backgrounds are done go dig up some scraps of cream colored or white cardstock. Stamp the butterfly as many times as you have cards (and maybe one more in case you screw up). Color the butterflies with your copic markers (or color medium of choice). I used stamps by Hero Arts. Dark chocolate ink and copic markers. Go stamp the butterfly on each of your cards. Cut out the butterflies that you colored. Go ahead and cut off the antennae, you will use the ones on the cards. Adhere your colored butterflies over the stamped ones. That's it! Cards are done. Put the cards in the box, top with the lid. Tie on a pretty coordinating bow ( I used PTI terracotta tile satin). Make yourself a cute tag using a butterfly (color it pretty) and a fillable frame. Glue em together, punch a hole and tie on some twine. If you measure carefully (ha I did not!), and don't drop anything in an ink pad (who, me?) you should finish this in about an hour or so. Have fun!
21 comments:
wow, this is gorgeous. thanks for the directions too!
that is just beautiful! wow!
Gorgeous Michele, thanks for the play by play too!!:)
WOW!!!! This is so beautiful, Michele! What a fabulous, coordinated project. Feeling very inspired to stamp some butterflies!
This is a fabulous set. I'm sure your daughter's teacher will be so thrilled. Watch out--the teachers at school might be fighting over who gets to have your little one in class next year. Thanks for the clear instructions. I am in the process of making a set of notecards inspired by your post last week with YOF minis. You have given me some good ideas as to how to spiff up the envies. I'll send you a link when I finally finish them. TFS
This is beautiful! What a gorgeous gift!
this is such a beautiful gift....the butterflies and vellum make it just so ethereal and dream-like....stunning!!
Oh, this is such a fabulous gift! Well done!
Beautiful gift and I do not blame you for wanting to keep it :) I have to say that is the most beautiful butterfly stamp I have ever seen....... love it ...... may have to buy it :)
This set is beautiful, Michele. I especially like the little touch of the "just a note" and butterflies stamped on the side of the box. That little touch adds a lot to your boxed pack of note cards.
This set is absolutely stunning. You remembered every detail from the box to the cards to the envies. Such an amazing set. They will make some teacher very happy!! That is...if you can part with it...:-)
WOW are these just amazing!!! Love the pop of color with each new card and butterfly. Your attention to detail is amazing on the box and everything else. Just a super lovely gift!!! I'm definitely bookmarking this page!
Beautiful sets! Thanks for the inspiration.
Beautiful! Love how you stamped Just a Note on the box.
How sweet! This card set is adorable! Love the pop of color from the butterflies!
Love the vellum lid! I must try that. Beautiful cards, too!
These are beautiful!! What a wonderful gift!!
I'm back to tell you that I pinned your box to my board on Pinterest. I don't want to lose this lovely piece of inspiration. Thank you so much for sharing the directions.
WOW,super fabulous work, you are sooooo talented! These are beautiful! Thank you for taking the time to share the tutorial with us. TFS.
Really beautiful and thoughtful. Once I'm done, do I have to give it away? XOXO
These are beautiful. Thanks for sharing.
Post a Comment